

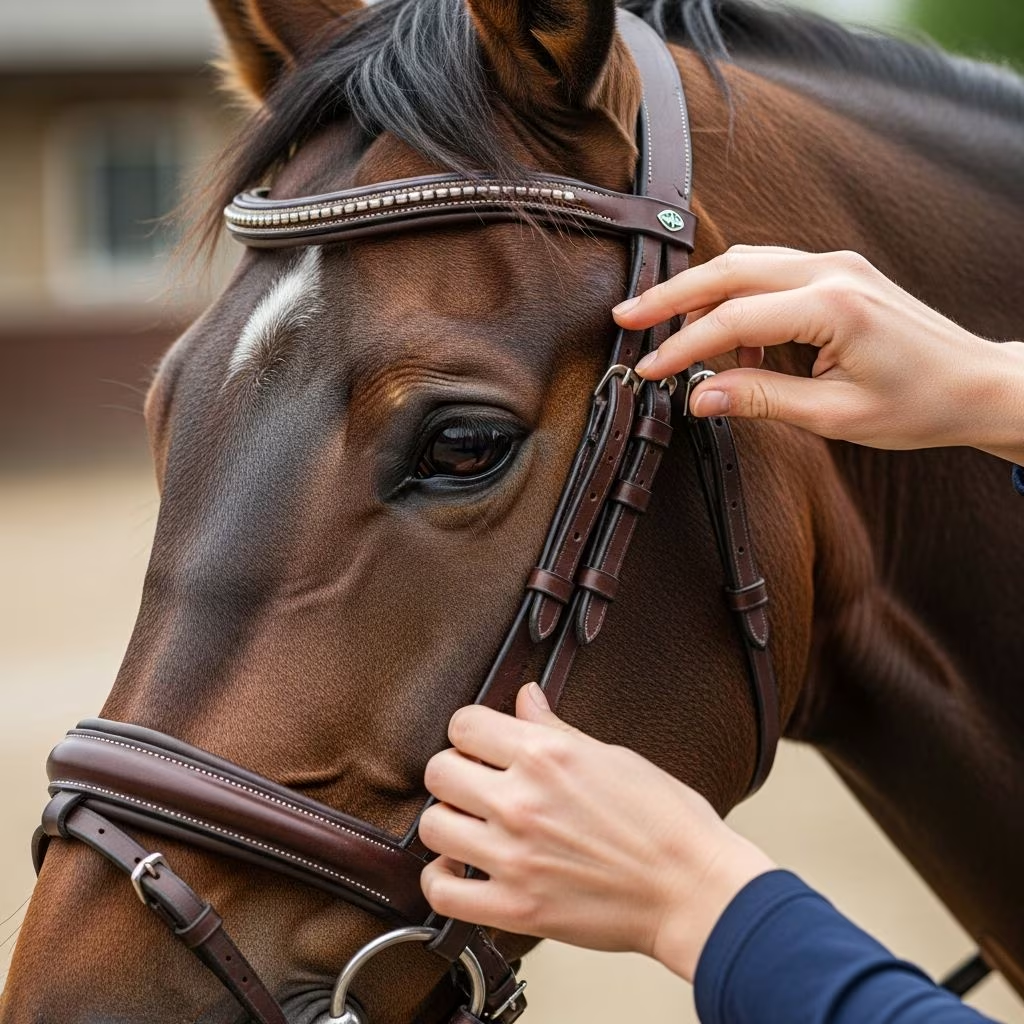
Properly fitting a bridle on a horse is fundamental to effective communication, rider safety, and equine welfare during riding activities. A well-adjusted bridle distributes pressure evenly, prevents discomfort, and allows natural head movement. This guide provides a detailed roadmap to achieve an optimal fit, drawing on established equine fitting principles to help riders of all levels enhance their horsemanship.
Understanding Bridle Components and Their Roles
Before adjusting any tack, familiarize yourself with the bridle’s anatomy. The headpiece rests behind the ears at the poll, providing the foundation. Splits at each end connect to the browband, which spans the forehead, and the cheekpieces, which support the bit. The throatlatch secures under the jaw, the noseband encircles the muzzle, and the bit rests in the mouth’s corners. Each element must align precisely to avoid rubbing, pinching, or restricting airflow.
- Headpiece: Distributes weight evenly across the poll without pinching sensitive areas.
- Browband: Stabilizes the bridle laterally and protects underlying nerves.
- Throatlatch: Prevents forward slipping while permitting jaw flexion.
- Noseband: Aids in poll flexion and bit stability without compressing nasal passages.
- Cheekpieces: Position the bit correctly and maintain symmetry.
Recognizing these roles ensures adjustments prioritize horse anatomy over aesthetics.
Preparation Steps Before Fitting
Approach bridle fitting methodically to minimize stress. Start without the bit to focus on headgear alignment. Assemble the bridle loosely using mid-range holes for adjustability. If your horse is sensitive, use a halter initially for preliminary sizing, then transition. Position the horse in a calm environment with good lighting to observe subtle reactions like ear pinning or head tossing.
| Preparation Checklist | Action | Purpose |
|---|---|---|
| Clean all leather | Wipe with damp cloth; condition if dry | Prevents irritation from dirt or stiffness |
| Measure horse’s head | Use soft tape for poll-to-nose distances | Confirms size suitability |
| Remove conflicting tack | Clear halter or fly mask | Allows accurate placement |
| Have assistant if needed | For head-shy horses | Enhances safety |
Step-by-Step Bridle Application Guide
Begin by sliding the headpiece over the ears from front to back, keeping crown gentle. Align splits just below the browband for stability. Fasten loosely, then refine each strap systematically.
Positioning the Browband Correctly
The browband should sit 1-1.5 cm (about one finger width) below the ear base on both sides. This placement avoids pressure on facial nerves and vessels while preventing slippage. Test by inserting two stacked fingers alongside the ear; tightness pinches, looseness destabilizes.
Adjusting the Throatlatch for Security
Fasten the throatlatch to allow four stacked fingers between it and the throat vertically, and four fingers horizontally to the cheekbone. This ensures equilibrium without impeding swallowing or breathing. Too loose risks bridle lift-off; too tight restricts neck flexion.
Setting the Noseband Placement
Position the noseband 2-4 cm (two fingers) below the cheekbone crest to avoid bone contact. Snug it so two fingers fit between strap and nasal bridge. Proper tension supports bit action without hindering respiration—critical for welfare.
Aligning Cheekpieces for Symmetry
Cheekpieces must match exactly, with buckles in identical holes. They hang below the cheekbone, leaving at least one spare hole. Level positioning ensures even bit seating, vital for balanced rein aids.
Inserting and Fitting the Bit Precisely
With headgear set, insert the bit last. Slip thumb into mouth corners to induce salivation and relaxation. The bit rests just ahead of molars, forming 0.5-1 wrinkle at lip corners. Width should extend 0.25 inches beyond lips on each side, avoiding pinches or rattles. For loose-ring snaffles, ensure lips clear cheekpiece holes.
- High bit: Causes excess wrinkles, engages prematurely.
- Low bit: Leads to chomping or evasion.
- Ideal: Quiet acceptance, steady contact.
Comprehensive Fit Verification Checklist
After full assembly, inspect holistically. Symmetry trumps all—uneven straps signal misalignment. Mid-hole buckles indicate balanced sizing; extremes suggest wrong scale.
| Component | Fit Test | Acceptable Clearance |
|---|---|---|
| Headpiece/Poll | Two fingers under crown | No pinching behind ears |
| Browband | One finger below ears | Stable, no nerve pressure |
| Throatlatch | Four fingers stacked | Free jaw movement |
| Noseband | Two fingers under | 2-4 cm below cheekbone |
| Bit | 0.5-1 lip wrinkle | Ahead of molars, proper width |
Walk the horse; watch for rubbing, head shaking, or resistance. Revisit adjustments iteratively.
Common Fitting Mistakes and Fixes
Riders often overlook subtle issues leading to performance dips or health concerns. Nosebands too high rub cheekbones; throatlatches too slack allow tipping. Bits too low prompt mouthing; asymmetrical cheekpieces cause uneven pressure.
- Mistake: Browband too tight. Fix: Loosen to finger width, recheck splits.
- Mistake: Bit pinching lips. Fix: Widen or reposition cheekpieces.
- Mistake: Noseband restrictive. Fix: Lower and loosen for airflow.
Regularly consult a professional fitter for conformation-unique needs.
Tailoring Fits to Horse Types and Disciplines
Draft horses require wider nosebands; refined breeds need narrower bits. Dressage demands precise poll flexion; trail riding prioritizes durability. Custom components—like adjustable headpieces—accommodate variances.
For young horses, prioritize growth room with extra holes. Arabs favor shorter cheekpieces; warmbloods longer throatlatches.
Daily Maintenance for Longevity
Clean post-ride with leather conditioner to prevent cracks. Store hung to retain shape. Inspect stitching quarterly; replace worn parts promptly. Seasonal humidity adjustments maintain suppleness.
Frequently Asked Questions (FAQs)
What if my horse resists the bit?
Ensure correct height and width; salivate mouth first. Check dentition—teeth issues mimic fit problems.
How often should I recheck fit?
Weekly or post-growth spurts; muscle changes alter needs.
Can one bridle size fit multiple horses?
Rarely; measure each for precision.
Is a tighter noseband better for control?
No—restricts welfare; proper fit yields better response.
What tools help measure accurately?
Soft tape for head dimensions; finger widths for clearance.
Advanced Tips from Equine Specialists
Monitor zygomatic ridge—straps behind it prevent eye proximity rubs. For steady contact, bit ahead of molars optimizes tongue pressure. Video fittings for symmetry review.
Invest in quality leather; it molds better over time. Pair with saddle fit for holistic tack harmony.
References
- How to fit a bridle on a horse – A step by step guide — Pink Equine. Accessed 2026. https://www.pinkequine.com/how-to-fit-a-bridle/
- Bridle Fitting 101 — Weatherbeeta. Accessed 2026. https://www.weatherbeeta.com/blog/bridle-fitting-101
- Bridles and Bits: How They Should Fit — Paddock Blade USA. Accessed 2026. https://paddockblade.com/blogs/news/bridles-and-bits-how-they-should-fit
- It’s all in your head… or your horse’s head! Fitting a Bridle Properly — Schleese. Accessed 2026. https://schleese.com/its-all-in-your-head-or-your-horses-head-fitting-a-bridle-properly-part-i/
- Fit Your Bridle for Optimal Comfort — YouTube (Amelia Newcomb Dressage). Accessed 2026. https://www.youtube.com/watch?v=f4ePGfREP04



