

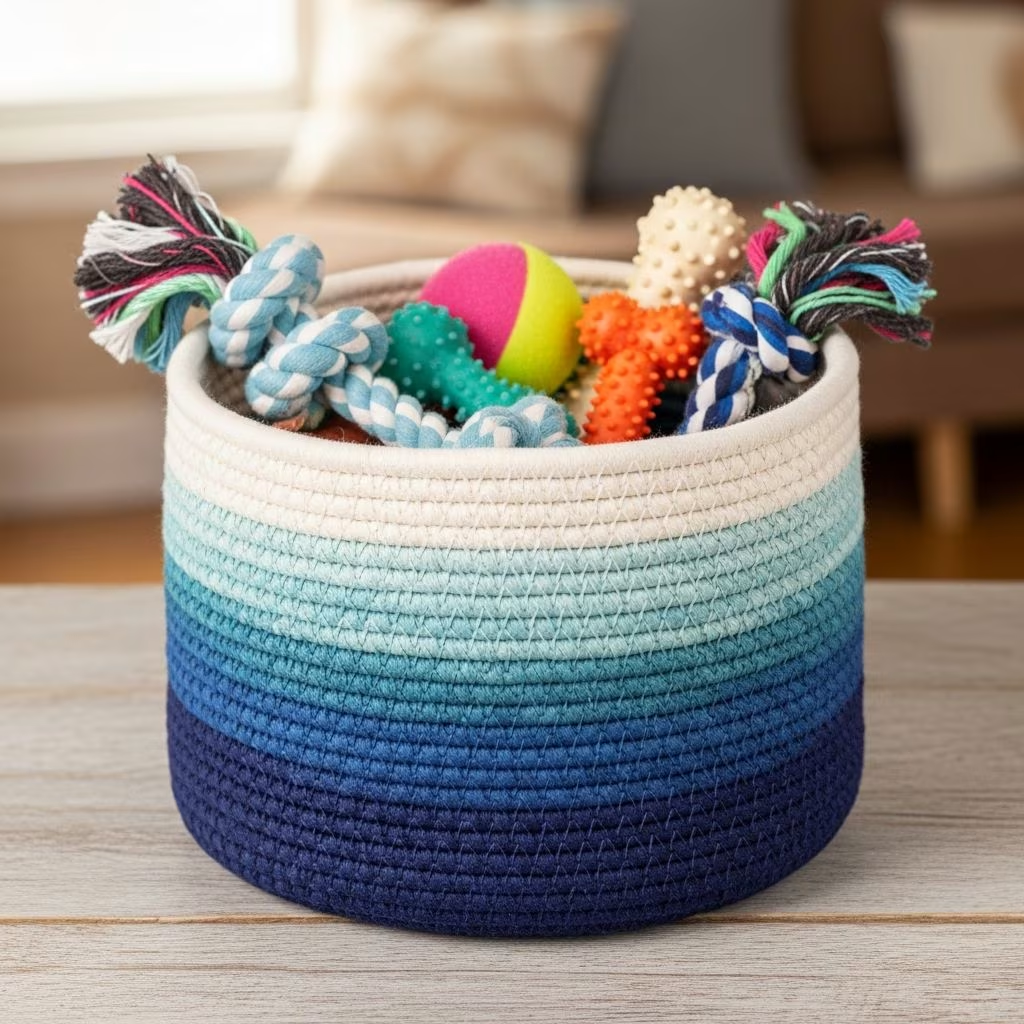
How to Make an Ombre Toy Basket for Pets
Creating a stylish and functional storage solution for your pet’s toys doesn’t have to be complicated or expensive. An ombre toy basket is an easy DIY project that can be customized to match any décor while keeping your home organized. Whether you have a dog, cat, or other pet, this project is simple enough for beginners yet produces professional-looking results. In this guide, we’ll walk you through everything you need to know to create your own beautiful ombre toy basket.
What Is an Ombre Toy Basket?
An ombre toy basket is a storage container designed to hold pet toys and accessories while featuring a gradient color effect. The ombre technique creates a smooth transition from one color to another, giving the basket a modern, aesthetic appeal. Rather than using a single solid color, the basket displays multiple shades of the same color family, blending seamlessly from light to dark or vice versa. This DIY project combines functionality with style, making it both practical and visually appealing for any pet owner.
Why Make Your Own Pet Toy Basket?
Making your own pet toy basket offers several advantages over purchasing pre-made storage solutions. First, you have complete control over the colors and design, allowing you to match your home’s décor perfectly. Second, DIY projects are typically more cost-effective than buying specialty pet furniture. Third, creating something yourself adds a personal touch to your home and can be a fun, rewarding activity. Finally, a custom basket sized to your needs will be more functional than generic store-bought options.
Materials You’ll Need
Before starting your ombre toy basket project, gather the following materials:
- A woven basket (wicker, seagrass, or jute work best)
- Acrylic paint in your chosen color (multiple shades work for ombre effect)
- Paintbrushes (various sizes)
- A spray bottle filled with water
- Newspaper or drop cloth to protect surfaces
- Paper towels or cleaning cloths
- Shallow containers or palettes for mixing paint
- Optional: primer for better paint adhesion
Choosing Your Colors
The key to a successful ombre effect is selecting the right color palette. You can choose colors within the same color family for a subtle gradient, or create a more dramatic transition. Popular ombre combinations include light pink to deep burgundy, pale blue to navy, cream to chocolate brown, or soft gold to burnt orange. Consider your home’s color scheme when selecting your palette. Autumn-inspired colors like burnt reds and dusky corals create a warm, inviting aesthetic, while cool tones like blues and purples offer a calming effect.
Step-by-Step Instructions
Step 1: Prepare Your Workspace
Start by protecting your work area with newspaper or a drop cloth. This prevents paint splatter from damaging your floors or furniture. Ensure you’re working in a well-ventilated space, preferably outdoors or near an open window. Gather all your materials within arm’s reach so you won’t need to step away during the painting process.
Step 2: Clean and Prime the Basket
Clean your basket thoroughly to remove dust and debris. If the basket is new, a gentle wipe with a damp cloth should suffice. For older baskets, you may want to use a soft brush to get into crevices. Once clean and dry, applying a primer helps the paint adhere better and last longer. Allow the primer to dry completely before moving to the next step.
Step 3: Prepare Your Paint
Pour your paint colors into shallow containers. You’ll want to have one container for each shade you’re using. This allows you to maintain separate colors and prevents muddy mixtures. If you need to create transitional shades, you can mix small amounts of paint to bridge the gap between your primary colors. Keep your spray bottle of water nearby to adjust paint consistency as needed.
Step 4: Apply the Lightest Color First
Begin painting the upper portion of the basket with your lightest color. Start slowly and work your way around the entire basket in horizontal strokes. The key to a successful ombre effect is working methodically and maintaining even coverage. Don’t try to cover the entire basket at once; focus on creating a solid foundation with your first color before moving to the next shade.
Step 5: Create the Gradient Transition
This is where the ombre magic happens. In the middle section of the basket where your two colors will meet, lightly apply the lighter color and begin blending in the darker shade. Use a damp paintbrush to gently blend the colors where they overlap. The water helps soften the transition, creating a smoother gradient effect. Work in small sections and take your time to achieve the desired blend.
Step 6: Apply the Darkest Color
Once you’ve created a nice transition zone, apply your darkest color to the lower portion of the basket. Continue the blending technique in areas where this darkest shade meets the middle transitional zone. Remember to work slowly and deliberately; it’s easier to add more paint than to remove it.
Step 7: Refine and Blend
Step back and evaluate your work. If you notice harsh lines between colors, use a clean, damp brush to soften the transitions further. You may need to apply additional coats to achieve the depth and richness you desire. Most ombre baskets benefit from two to three coats of paint, allowing each coat to dry between applications.
Step 8: Allow Proper Drying Time
Once you’re satisfied with the ombre effect, allow the basket to dry completely. Acrylic paint typically dries within a few hours, but check the paint manufacturer’s instructions for specific drying times. Don’t move or use the basket until it’s fully cured, which may take 24 hours or longer.
Color Combinations to Consider
| Color Combination | Effect | Best For |
|---|---|---|
| Cream to Chocolate Brown | Warm and Earthy | Traditional or rustic décor |
| Light Pink to Deep Burgundy | Sophisticated and Modern | Contemporary or feminine spaces |
| Pale Blue to Navy | Cool and Calming | Bedrooms or relaxation areas |
| Pale Gold to Burnt Orange | Warm and Inviting | Living rooms or autumn themes |
| White to Charcoal Gray | Minimalist and Clean | Modern or Scandinavian décor |
Tips for Success
Start with small sections: Rather than painting the entire basket at once, work in manageable sections. This gives you better control and helps ensure even coverage.
Use quality brushes: Investing in good paintbrushes makes a significant difference in the final result. Quality brushes hold more paint and create smoother, more even strokes.
Keep your brush damp: A slightly damp brush helps blend colors more effectively. Keep a spray bottle of water nearby and mist your brush as needed.
Work in layers: Apply multiple thin coats rather than one thick coat. This creates a more professional appearance and allows for better color blending.
Experiment with different basket sizes: This technique works on baskets of any size, from small cat toy holders to large dog toy storage units.
Consider the basket material: Woven baskets work best for this project. The woven texture helps paint adhere better than smooth surfaces.
Customization Ideas
While the traditional ombre technique creates a beautiful gradient effect, there are several ways to customize your pet toy basket further. You could add personalized text with your pet’s name using paint markers or stencils. Consider adding decorative elements like ribbon trim along the top edge or embellishments that match your pet’s personality. You might also experiment with reverse ombre effects, starting with dark colors at the top and transitioning to light colors at the bottom. For a modern twist, try a horizontal ombre effect instead of vertical, or create multiple color zones throughout the basket.
Maintenance and Care
Once your ombre toy basket is complete and fully dried, proper maintenance will keep it looking beautiful for years. Dust the basket regularly with a soft cloth to remove accumulated pet hair and debris. If the basket gets wet, allow it to air dry completely to prevent mold growth. Avoid placing the basket in direct sunlight for extended periods, as UV rays can fade your carefully blended colors over time. If the paint chips or wears, you can touch up those areas with matching paint for a quick refresh.
Alternative Painting Methods
While the traditional painting method works well, you might also explore alternative techniques. Spray painting offers a faster application and can create smooth gradients more easily, though it requires more surface preparation. Dye-based methods work for natural fiber baskets and create subtle, professional-looking results. Some crafters prefer using fabric paint for a softer finish that may be more forgiving on delicate woven materials. Whichever method you choose, the principle remains the same: create a smooth color transition for the ombre effect.
Troubleshooting Common Issues
Harsh color lines: If your color transition looks too abrupt, use a damp brush to gently blend the boundary between shades. Add additional thin coats to gradually build up the gradient.
Uneven coverage: This often results from applying paint too thickly. Use thinner coats and build up coverage gradually with multiple applications.
Paint peeling or chipping: Ensure the basket is properly primed before painting. Poor surface preparation is usually the culprit. For future projects, use a quality primer designed for porous surfaces.
Colors appearing muddy: This happens when too many colors blend together or when you’re not using clean brushes between colors. Keep a bowl of water nearby to rinse your brush between color applications.
Frequently Asked Questions
Q: Can I use any type of basket for this project?
A: While any basket can technically be painted, woven baskets made from wicker, seagrass, or jute work best. These materials have a texture that helps paint adhere properly. Smooth, plastic, or metal baskets may require primer specifically designed for those surfaces.
Q: How long does it take to complete this project?
A: The actual painting typically takes 1-2 hours, depending on basket size and complexity. However, you’ll need to account for drying time between coats, which can extend the total project time to a full day or longer.
Q: Is acrylic paint safe for pets?
A: Once fully dried and cured, acrylic paint is non-toxic and safe for pets. However, during the drying process, it’s best to keep your pet away from the painted basket to prevent accidental ingestion of wet paint.
Q: Can I use other paint types besides acrylic?
A: Yes, you can use various paint types. Latex paint, spray paint, and fabric paint all work for this project. Choose based on your comfort level and desired finish.
Q: What if I make a mistake while painting?
A: Minor mistakes can often be corrected by applying additional coats. For larger errors, allow the paint to dry and sand the area lightly, then repaint. Since this is a DIY project, imperfections add character and are part of the handmade charm.
Q: How do I seal the painted basket for durability?
A: While not necessary, applying a clear coat of polyurethane or polycrylic varnish can protect your ombre design and extend the basket’s life. Use a water-based formula to maintain color vibrancy.
Q: Can I create an ombre effect with more than two colors?
A: Absolutely! Using multiple colors creates a more complex and visually interesting gradient. Simply follow the same blending technique, working with three, four, or more color shades from light to dark.
Conclusion
Creating an ombre toy basket for your pet is a rewarding DIY project that combines functionality with aesthetic appeal. By following these step-by-step instructions and tips, you can create a beautiful, custom storage solution that perfectly complements your home’s décor. Whether you’re a seasoned crafter or tackling your first DIY project, this basket-painting technique is accessible and forgiving. Your pets will enjoy having their toys neatly organized, and you’ll appreciate the stylish addition to your home. Start with materials on hand, choose colors that speak to you, and enjoy the creative process of bringing this project to life.
References
- Paint your own DIY ombre storage basket — Resene Paints. https://www.resene.co.nz/homeown/habitat/ombre-basket.htm
- How to Make an Ombre Toy Basket for Pets — Chewy Pet Education. https://www.chewy.com/education/dog/pet-parenting/pet-parenting-diy-recipes-how-to-make-an-ombre-toy-basket-for-pets
- DIY Ombré Dyed Baskets for Toy Storage — Erin Spain Crafts. https://www.erinspain.com/diy-ombre-dyed-baskets-toy-storage/



